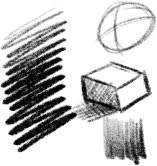
A few weeks ago, my friend Michael Ricca told me of a challenge he once had to build a brush that painted in a halftone screen. Unable to help myself, I immediately began to try and construct a solution in my head. The result isn't a brush exactly, it's more of a layer setup. But it works pretty well, and is fast and fun to play with.
I have built an Action that automatically sets up the layers so you can jump right in and draw. I recommend starting with a big, soft edged brush to get an idea of what it does, but it will work with any brush. Just create a new document, run the action, pick a brush and start painting (if nothing appears, see the clipping mask note below).
The halftone effect itself is an effect on a Smart Layer, so if the screen size isn't to your liking you can open the filter and modify the parameters.
Some things to note: The drawing area is actually a layer mask of a halftone screen, not a layer unto itself. so if you are switching around layers and want to get back to drawing, remember to activate the layer mask.
 Also, if you are drawing and don't see anything, it is probably because there are two adjustment layers above the halftone layer that, depending upon your Photoshop settings, may set themselves up as clipping masks (CS4 and below I think). If they appear clipped to the halftone layer, like in this image, release the clipping mask on them via the Layers menu pulldown. I *think* this should not be an issue in CS5 which includes a parameter to override the clipping mask preference.
Now, here is a challenge to you: Currently this method only works when creating a single color (in this case Black) screen. I would *love* to be able to have this work on a 4 color process, so that one could paint on each color channel individually. But because of the way this particular method works, it effects all layers below, so it doesn't composite nicely. The only way I can figure is to move this entire setup into smart layers, but then one has to open the smart layer, paint, save and close before seeing the results, which isn't immediate enough to be practical. If anyone can figure out a way to do more than 1 color screen, please post a solution. ((Just changing the current halftone screen angles isn't the solution. One has to be able to paint 4 separate halftone screens that blend into one full color image).
Download the action here: Halftone Brush.zip